Category Archives: Projects

Slow Down, Look Closer Photography Exhibition

I have my very first solo photography exhibition running this month at the North York Central Library, 5120 Yonge St. entitled SLOW DOWN, LOOK CLOSER.  Please check it out if you’re in the area and see Willowdale from a “bee’s eye view”.

Details over at http://slowdownlookcloser.chrisnolan.ca/

LifeHack: How to Replace your Toronto Public Library Card

tpl-logoAs you may know, we use the library A LOT (over 500 checkouts so far this year (track it yourself with athenaeum)).  Somehow or other, the barcode on the back of my library card is wearing out (darn you Friction!), making it more and more difficult to get it to scan at the self-checkout stations.  The kids helped me (they are short) find the keyboard locked under the shelf checkout station, and we learned how to unlock it, pull it out and type in the library card # to get by.  This lasted a while, until I was almost ready to go to the circulation desk to claim a new card, thus suffer the personal horror of being assigned a new number, and more terribly, a new location on the holds shelf — when I had an epiphany.

It is just a barcode.  I know how to make barcodes.  Why don’t I replace the barcode on my library card?  I could just paste it over top the worn out one and I’d be off to the races.  But wait, why stop there?  I carry around three library cards (mine, my wife’s and my son’s), taking up over 40% of the contents of my pocket on any given day, let’s solve that problem too.  I proceeded to print up a sheet with all three library card #’s barcodes so now I just have a tiny slip of paper and presto problem solved, life hacked.  For those who carry a smart phone, it is even simpler as you just can keep an image file on your phone and display that to the barcode scanner and be on your way.

Only times you need your card now are when you need to present official identification to government officials.

Don’t get carried away with this though.  You wouldn’t want to ‘cheat‘ any other systems by consolidating your barcodes, or heaven forbid alter something’s code.

I wonder if there is a keen enough library user who wants their library card for life that will get a working tattoo barcode of their library card?

sample library card numberWant to do it too?  Super easy way is to just follow this link here to Barcodes Inc’s Generator. and look to your browser’s address bar and change the number where it says code= to your library card number — make sure you leave all the other things in place.  I’ll state the obvious, the barcode seen in that link is not a valid barcode, it isn’t your library card #, you must type your own personal number in there (and know that there is a small chance someone somewhere will have a record of your number in a log file).  If you’re going to do it yourself using the form (click advanced options) or have other tools to make a barcode I tested and found that the “numeric only” codes are recognized by the library’s scanners.  Thus pick “Interleaved 2 of 5” or “Code 128-C” to get you started.  Once you have your image file of your barcode, do what you want with it in terms of laying it out to be printed, or encoding it to be tattooed, or sending it to your smart phone.  Good luck, and have fun!barcode-tattoo-10Note this should in no way be limited to the Toronto Public Library system.  Anywhere that has a self-checkout that uses a barcode can be hacked in this way.

Koch Snowflakes

Came across Sal‘s discussion of the Koch Snowflake (on wikipedia) yesterday.

Got a little obsessed and wanted to draw it programmatic like I did 20+ years ago when I first saw the Sierpinski Gasket on a NOVA tv show (which I re-did using Khan’s software a few months ago).  After a few failed attempts (and a failing to recognizing my usage of sine and cosine), today I went and looked for someone else’s code just to get me through it (oh the aging brain!) and found N-Wing’s code over at everything2.

Here it is: Koch Snowflake Fractal (Doh, WordPress isn’t allowing me to embed the program right here in the blog).

Vi Hart shows them in her Triangle Party Doodling too if you like her style (who doesn’t?).

Amped for my PulseSensor Amped

I first read about Yuri Gitman and Joel Murphy‘s PulseSensor a few months ago in MAKE Magazine and was intrigued by its simplicity.  Last month, I decided I was going to get one to track my heart rate during my conditioning class at circus and I planned to have it ready for my first class.  Turns out they were all out of stock, and the date for new stock got pushed a couple of times.  MakerShed said they could ship within 1-2 days but I wanted to order direct so they’d get a bigger slice of the order (and I wasn’t sure if the 1-2 days was accurate as I figured they didn’t actually stock it).

I received notification this morning that they had new stock, and it’s a new and improved ‘Amped‘ version (with amplification and noise cancellation circuitry to the hardware) (note: the new version is 25% higher in price).  I’m very pleased that I placed the order 53 minutes after the initial email, and less than 2 hours later it has been shipped.  It’s coming standard USPS (with a shipping cost of 60% of the product price) so hopefully I won’t get dinged with Customs handling and GST (for another 50% of the product price).

I’ll update you when it has arrived and once I’ve hacked together something of use to quantify myself during extreme exercise.  In the mean time, check out Becky Stern‘s ‘Beating Heart Headband

How to use Makey Makey as an Arduino

Our MakeyMakey arrived today (13 days after shipping (we were in the Kickstarter) for those counting) (and thankfully no problems with customs)!  Following the Howto as linked on the back of the board was great for the basic stuff (and I spent more time with the ‘one button games‘ that I should have) but I was immediately drawn to the arduino-ness of the board, but didn’t see anything on the HowTo page.  After digging through the forums and following a few links I’ve deduced the following setups:

  1. If you don’t already have an arduino, download the IDE
  2. Hit up the MakeyMakey Sparkfun page for links to the latest versions of the following.
  3. If you’re on windows, download the driver (presently here) and extract the folder somewhere on your system.  Open up ‘Device Manager’ and find the ‘USB IO’ device that’s unknown (unless of course you didn’t follow the Howto instructions on ignoring the pop-ups during first connection, then  you can just use those links), and click through to it to manually install the driver, and then browse to the place you extracted the ‘driver’ folder.
  4. Download the ‘Makey Makey Arduino Addon‘, which will have a ‘hardware’ folder and a readme.  Either read through the readme, or copy & paste the hardware folder to your ‘sketchbook location’ (find yours in your arduino environment under File->Preferences).  You can also find this on github here.  Having this in place means that under “Tools -> Board” in your sketch software you’ll now have the custom config for the MakeyMakey version of Arduino.
  5. If you want somewhere to start from — e.g. just want to alter what letters are assigned to which pins copy the files from this makey_makey github to a sketch folder and load it up and tweak.  This is also the code to reload your makey makey if you happen to have tried some other arduino program before you found this page and bricked your makey makey.

Hopefully I’ll post some updates as to what the kids come up with soon, but for now, here’s the ad from the makers of this open-source piece of awesome:

Sparkfun has a tutorial posted as well.

LEGO Quest Kids Olympics: Swimming & Diving

The kids accepted the LEGO Quest Kids #51 Challenge: Olympic Event.LegoQuest Olympics Swimming & Diving photoAbove is a photo of their creation that we’ve submitted to the challenge.  And below is a video of them explaining it and some cute bits of them making it.

Sam runs the LEGO Quest once a month on her blog, and it’s open to all home educated families around the world. I’ll update here with the link to all the other entries once they get posted. Happy Building!

Update: the submissions have been posted!  Go and review the 140+ entries of amazing lego creations from kids from all over.

Athenaeum update

I updated my athenaeum project today with the following features:

  • now populates a ‘currently-checked-out’ shelf so you can see in one place what you have out from the library.  I found that since I was running it for a few weeks now, I had over 100 items in my ‘checked-out’ total shelf so I wanted to be able to get more granularity over the items I had out.
  • Further to that, I also add books to a shelf per month they are checked out. More to just capture the data at this point.  Should help me know which books we check out multiple times too.
  • I also added the ability to have multiple library cards right in the config file and wrapped that up in a YourAccounts class.  That way I didn’t have to manually get the 2nd library card in the script each time I was running it vs. checking it in to the repository (didn’t want to accidentally check in my library card # to github).

Please let me know if you’re using the script at all.

Selecting a Rugged Point & Shoot Camera for the Family

The family point & shoot stopped working months ago, due to sand getting in the gears.  It started last year when I did a bit of urbanexploring and I jumped in a lot of mud.  Then after a couple of days on the beach it seized up, limiting our photo taking on our holiday.  I cleaned it up a few times, got it working for a while longer with the caveat of not using the zoom but then the kids banged it one day and the lens assemble just wouldn’t retract.  I did take it all apart, got the sand out of the gears, re-seated it etc which got the lens assemble working again, but something I did while having it apart (probably snapping a couple of tiny plastic clips) prevented it from booting up.  Jen decided she missed having regular video & photos of the kids (we had been getting by using her phone occasionally, and sometimes lugging the full DSLR around) so I was tasked with selecting ourselves a ‘waterproof’ camera for our next holiday, but wasn’t looking forward to it since I was expecting bulky bulbous things that I wouldn’t use the rest of the time.

Slick product image of the Sony Cyber-shot DSC-TX20 L (L for Blue)First up it seems that ‘waterproof’ cameras are coming into a new class marketed as ‘rugged‘.  That means waterproof, dustproof, freezeproof, crushproof and shockproof but still with some style and not all designed to look like they float.  I’m hoping dust-proof means sand proof too, but we’ll have to see as none of the literature I reviewed is explicit.

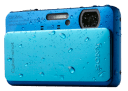
For those curious, I selected the Sony Cyber-shot TX20 (DSC-TX20L).  After reviewing a lot of info I realized that it really came down to size for me.  This guy is speced to be 96x56x18mm and only 133g with battery and memory card.  I think they call this a ‘slim’ or ‘pocket’ profile when it comes to camera sizes?  It was only 2mm wider than the old canon and the same weight, and 30% thinner and 40% lighter than the other rugged cams I researched.  I typically only have one bill, one key and 7 cards in my pocket when we’re out of the house so my pockets feel empty.  With the last camera I noticed it there (and it even wore out a pocket in one pair of pants) but it wasn’t a supreme encumbrance.  Plus it was on sale $50 off at *shudder* Futureshop (that sale ended, but it’s still $20 off for the rest of the month) (and for the record there were none of it, or the previous model the TX10, available on Craigslist or Kijijii).

The trade offs from some of the others: in the higher end of the price class, lacked GPS which the others in that price class had, and didn’t have the biggest aperture (f3.5 vs f2.0 from the Olympus TG-1), and it was also the least rugged of the lot (but that mainly means it’s not for scuba diving or the arctic).  I do like the idea of geo-tagging the pics, but I think the battery drain and boot-up delays that feature might cause aren’t worth it yet, and low-light is always a problem and can usually be over-come with using the DSLR since we’d probably be at home in those situations anyway.  Also, there have been problems with Sony’s Video codec and mac compatibility in the past, but they seem to have resolved it recently?

For those looking to continue their own research you might want to start here:

I tried out ShopBot.ca for searching Canadian retailers for the product, here’s an example for the Olympus TG-1.  It lead me to where I’d expect for high-end camera choices in Canada: Vistek and Henry’s (not that these models are high-end, rather consumer grade).

My other contenders were the Olympus TG-1 (they have an entire LifeProof line), the Nikon AW100, and the Lumix models.

And to finish with some fun-stuff: during my research I came across these really cute babies underwater, also this kid has lots of fun with his sony in a pool.  Wonder if we’ll try to get around the City of Toronto’s camera at the pool policy or not?

I look forward to posting more photos on my facebook, and more videos to my youtube channel in the next while.

I can solder! 7-Segment Serial Display & Nunchucky operational

I’ve been toying around with some electronics projects the last few months, but have been putting off the basic requirement of actually soldering anything.  I got a basic iron and misc tools around 6 weeks ago, and a couple of components that needed assembly (piggy backed on our robot order) but just hadn’t made the leap.  Until now.

I started with the 7-Segment Serial Display (Blue) (ordered from Solorbotics) which needed a few wires attached if I was going to do any prototyping with it.  From looking around it looked like I only needed to wire-up the Gnd and the Vcc connections (these were labelled on the circuit board).  After putting way too much solder on the first pin (and subsequently using my ‘solder sucker’ to clean it up) the next pin went smoother.  After looking at some example code it became clear I also needed to wire up the “Rx” connection as well.  Three wires total soldered up.  Just plugging it into the arduino made it display 4 zeros so that told me it was operational.  Update: you don’t actually have to solder these wires on… just bending them through the holes would have worked too.

These projects are still a bit obscure for me, so I wasn’t sure how to get started.  I read through the User Manual which was clear enough, but I figured there was code out there already.  I found this wall of text which I managed to digest down into this gist (and updated it thanks to these notes) which you can see running in the above video.

// example of using 7-Segment Serial Display
// product available from https://www.sparkfun.com/products/9765
// based on code from http://www.arunet.co.uk/tkboyd/ec/ec1led4x7ser.htm
// Note: solder wires at Gnd/Vcc & Rx, Rx goes to a digital pin on the arduino.
// Video available at http://www.youtube.com/watch?v=YVMAzYqV4kg
// Blogged @ https://chrisnolan.ca/2012/08/05/i-can-solder-7-segment-serial-display-nunchucky-operational/
#include <SoftwareSerial.h> // Arduino 1.0 included
#define SerInToArdu 2
#define SerOutFrmArdu 3 // pin it's plugged into
#define wDelay 300//no ; here. Sets how long each "message" appears
SoftwareSerial mySerialPort(SerInToArdu,SerOutFrmArdu);
// The above creates the serial channel we will use.
void setup(){
pinMode(SerOutFrmArdu,OUTPUT);
pinMode(SerInToArdu,INPUT);//Not actually needed...
mySerialPort.begin(9600);
mySerialPort.print("v"); //To reset display module
};
void loop(){
default_example();
scroll_word("4321");
scroll_word("87654321");
scroll_word("HELLo noLAn");
scroll_word("123456789");
mySerialPort.print("xxxx");//Send an "x" to turn a digit off
delay(wDelay);
delay(wDelay);
};
void default_example() {
mySerialPort.print("1234");
delay(wDelay);
mySerialPort.print("234x");
delay(wDelay);
mySerialPort.print("34xx");
delay(wDelay);
mySerialPort.print("4xxx");
delay(wDelay);
mySerialPort.print("xxxx");
delay(wDelay);
mySerialPort.print("----");
delay(wDelay);
mySerialPort.print("8888");
delay(wDelay);
mySerialPort.print("HEL0");
delay(wDelay);
mySerialPort.print("NoLA");
delay(wDelay);
mySerialPort.print("oLAn");
delay(wDelay);
mySerialPort.print("LAnx");
delay(wDelay);
mySerialPort.print("Anxx");
delay(wDelay);
mySerialPort.print("nxxx");
delay(wDelay);
};
void scroll_word(String w) {
int length = w.length();
if (length <= 4) {
mySerialPort.print(w);
delay(wDelay);
} else {
w = " " + w + " ";
for (int i=0; i<= length+4; i++) {
mySerialPort.print(w.substring(i,i+4));
delay(wDelay);
}
}
}
view raw gistfile1.ino hosted with ❤ by GitHub

While the ‘iron was still hot’ (ok, not really but it sounded good — I actually waited until my son was home so he could watch) I put together the next project, which was a NunChucky Wii Nunchuck I2C Breakout Adapter .  This adapter required some headers (male & female) to be soldered on (while the WiiChuck wouldn’t have).  For the first bit of soldering I used my little ‘helping hands’ gizmo for holding both the circuit board, and the wire going in, so my hands were free; this time around I just set it on the table with the header poking through and soldering it that way.  This resulted in a slightly lop sided connection.  For the 2nd header, I used my other ‘helping hands’ (i.e. my son) to so we could solder with 4 hands instead of 2.  I made a video of the NunChucky in action too (and combined with the 7-Segment display) if you’re curious.

The code for the Nunchucky is based on Tod Kurt’s library (which he based on Chad Phillips code) and you can see my mods to his demo in this gist to output the button presses to the display.  Aside: did you know a “1” is different than a ‘1’ in Arduino?

/*
* WiiChuckDemo --
*
* 2008 Tod E. Kurt, http://thingm.com/
*
* with code for 7-Segment Display added by Chris Nolan.ca
* based on https://gist.github.com/3268581
*
*/
#include <Wire.h>
#include "nunchuck_funcs.h"
#include <SoftwareSerial.h>
int loop_cnt=0;
byte accx,accy,zbut,cbut;
int ledPin = 13;
#define SerInToArdu 2
#define SerOutFrmArdu 3
#define wDelay 300
SoftwareSerial mySerialPort(SerInToArdu,SerOutFrmArdu);
String seven_seg;
void setup()
{
pinMode(SerOutFrmArdu,OUTPUT);
mySerialPort.begin(9600);
mySerialPort.print("v");
seven_seg = "x--x";
mySerialPort.print(seven_seg);
Serial.begin(19200);
nunchuck_setpowerpins();
nunchuck_init(); // send the initilization handshake
Serial.print("WiiChuckDemo ready\n");
}
void loop()
{
if( loop_cnt > 100 ) { // every 100 msecs get new data
loop_cnt = 0;
nunchuck_get_data();
accx = nunchuck_accelx(); // ranges from approx 70 - 182
accy = nunchuck_accely(); // ranges from approx 65 - 173
zbut = nunchuck_zbutton();
cbut = nunchuck_cbutton();
Serial.print("accx: "); Serial.print((byte)accx,DEC);
Serial.print("\taccy: "); Serial.print((byte)accy,DEC);
Serial.print("\tzbut: "); Serial.print((byte)zbut,DEC);
Serial.print("\tcbut: "); Serial.print((byte)cbut,DEC);
if (zbut == 0) {
seven_seg.setCharAt(0, '0');
} else {
seven_seg.setCharAt(0, '1');
};
if (cbut == 0) {
seven_seg.setCharAt(3, '0');
} else {
seven_seg.setCharAt(3, '1');
};
mySerialPort.print(seven_seg);
Serial.print("\t7Seg: "); Serial.println(seven_seg);
}
loop_cnt++;
delay(1);
}
view raw gistfile1.ino hosted with ❤ by GitHub

Next time, don’t put off til tomorrow what you can do today.

What will you make?